


If you’ve ever wondered how to turn AI into something truly useful for your workflows, this is a great place to start.
Dot’s most powerful feature, agent creation, lets you build intelligent AI agents, digital assistants designed to perform specific tasks like generating reports, answering customer questions, or any other task-specific expertise you have in mind.These agents can be linked into complete workflows that run automatically, saving you time and effort across your team.
No coding needed. No complicated setup. Just describe what you need, and Dot helps you bring it to life.
Before we get started, a quick note: If this is your first time hearing about Dot, that’s totally fine. Dot is an all-in-one AI platform that helps you create, manage, and deploy AI agents and workflows across your organization. But there’s more to it than that. If you’re curious to learn more about what Dot is and how it works, you can start with our 'What is Dot?' blog post.
What Is an AI Agent and Agent Creation?
First, let’s define the term of AI agent.
Think of an AI agent as a digital teammate. Just like someone on your team might specialize in answering customer emails, writing content, or analyzing spreadsheets, an AI agent is built to take on one focused responsibility and deliver consistently.
But these agents are not just passive tools. They can:
- Interpret your instructions
- Pull from relevant data or files
- Make decisions based on context
- Carry out actions across multi-step workflows
- Adapt to different tasks depending on how you configure them
For example, an agent can be as simple as a chatbot that replies to customer questions using your internal documentation, or as advanced as a report generator that turns raw CSV files into weekly insights for your sales team.
This is where agent creation comes in. It’s the process of designing, naming, and setting up these AI agents so they can do the work you want them to. And with Dot, this process doesn’t require any code or engineering background. If you know what job you want the agent to do, Dot helps you create it, step by step, through a simple and intuitive interface.
The best part? You’re building reusable, reliable AI teammates that can be part of larger, automated workflows. That means less manual work for your team and more space to focus on what matters most.
When Should You Create an AI Agent?
You don’t need an AI agent for every single task. But when something starts repeating itself, takes too much time, or needs to be done the same way every time, creating an agent is a smart move.
You’ll want to create an AI agent when:
- You have a task that repeats regularly and drains your team’s time
- You want consistent output with less errors
- You need a reliable assistant that is available 24/7
- You want to chain multiple steps together into an automated workflow
If you’re dealing with things like reviewing documents, managing data-heavy processes, answering support requests, preparing reports, or running content approval cycles, these are all ideal use cases for AI agents in Dot. Instead of doing the same work over and over, you can build an agent that handles it for you, freeing up your team to focus on the tasks that require real thinking.
So, what does agent creation actually look like in Dot? Here’s how it works.
Step-by-Step Agent Creation in Dot
Creating an AI agent in Dot is easier than you think. All you need is to have a clear task in mind. From there, Dot helps you build an intelligent assistant that can perform that task over and over again, without any code or technical complexity. And the best part? Dot is right there with you throughout the journey of crafting your agent. Its role is to guide you, prodding with relevant questions that help sculpt the agent to your preference, and advising you on ways to ensure its optimal operation.
.avif)
Let’s walk through a real example together.
Step 1: Name and Describe Your Agent
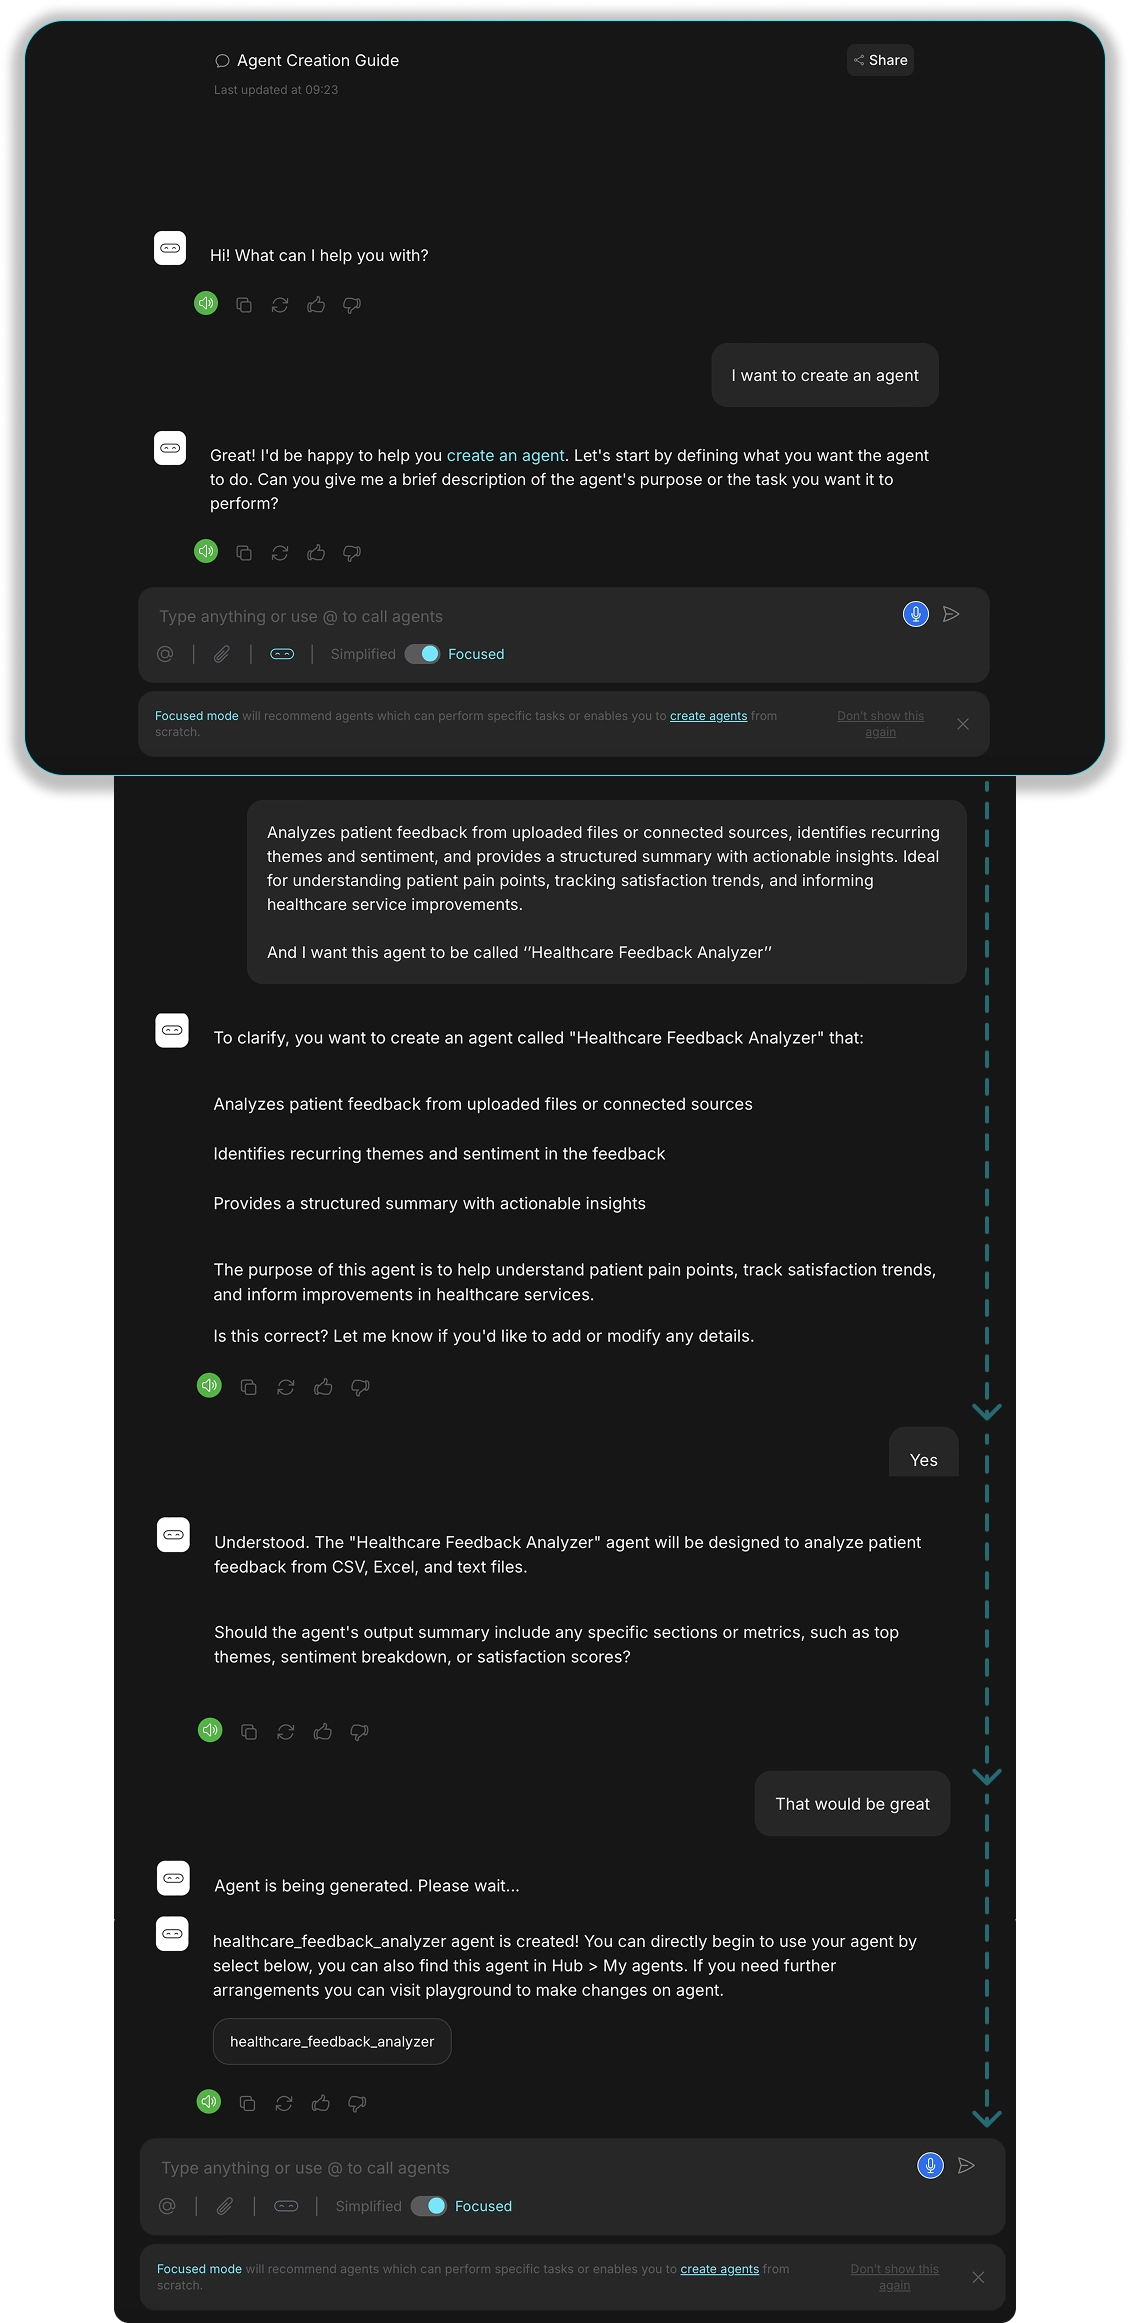
Once you're in Focused Mode and click on “Create An Agent” (you’ll see a little agent fellow), you'll be prompted to give your agent a name and a short description of what it’s supposed to do.
Example Agent
Name: Healthcare Feedback Analyzer
Description: Analyzes patient feedback from uploaded files or connected sources, identifies recurring themes and sentiment, and provides a structured summary with actionable insights. Ideal for understanding patient pain points, tracking satisfaction trends, and informing healthcare service improvements.
Important Note: Giving your agent a specific purpose like this helps Dot fine-tune how it works, so it delivers better results from the very beginning.
Step 2: Define the Task and Input
After naming and describing your agent, it’s time to define what the agent should actually do. This means giving it a clear task and telling Dot what kind of input the agent will work with.
For example, you can set up the Healthcare Feedback Analyzer to:
- Accept Excel, CSV, or PDF files containing patient comments or survey responses
- Detect recurring keywords, emotional tones, and pain points
- Group findings into themes (e.g., wait times, communication, cleanliness)
- Summarize everything in a few structured paragraphs
Prompt Example:
“When I upload patient feedback data, summarize the main topics patients are talking about, detect the overall sentiment, and suggest 2-3 ways to improve our service.”
You don’t need to phrase it perfectly, Dot will help you fine-tune it during setup.
Step 3: Add Sources (Optional)
To make your agent smarter and more accurate, you can add sources for it to refer to during the task.
For example:
- Upload historical feedback reports
- Connect documents like satisfaction benchmarks or internal quality guides
- Add knowledge bases your healthcare team already uses
These help your agent deliver more relevant and context-aware results.
Step 4: Finalize and Launch Your Agent
Once you've reviewed the task, description, and any sources, Dot will ask you one last time if you'd like to make any final adjustments. If everything looks good, just confirm and your agent will be created instantly.
You’ll see a confirmation message like this:
healthcare_feedback_analyzer agent is created!
You can begin using your agent right away by selecting it from the chat window, or find it anytime under Hub > My Agents.
Want to fine-tune how it works? Just head to the Playground tab to adjust settings or behavior.
Don’t worry if the Playground section sounds unfamiliar, you’ll get to know it in the next parts of this article.
From this point, your agent is live and ready to go. Whether you want to upload files, start a workflow, or test a use case, you can begin immediately.
And even though we mentioned above that creating an agent starts with a detailed prompt, Dot is always ready to guide you with helpful suggestions along the way, just like this:
So, how do you actually start using the agents you’ve built?
From Creation to Action: Using Your AI Agent in Dot
Step 1: Switching to Focused Mode
Before using your first agent, make sure you are in Focused Mode. This is where all structured tasks, agent-based workflows, and automations take place.
When you first log in to Dot, you can select Focused Mode right away. Or, if you’ve already started chatting in Simplified Mode, just use the toggle in the chat window to switch over to Focused.
Once you’re in, you’ll see options to browse available agents, activate one, or create your own from scratch. Let's go through the process of activating an agent.
Also, If you want to understand the difference between Simplified and Focused Mode, we’ve covered it all here.
Step 2: Choose an AI Agent
Once you’re in Focused Mode, you can choose from a list of available agents by clicking the @ button in the input box. This opens up a panel where you’ll see different agent options categorized under All, Novus agents, and My agents, depending on whether you’re using a ready-made agent or one you’ve created yourself.
From here, you can browse agents like Social Media Content Creator or Content Summary, check what each one does, and activate the one that fits your workflow best.
As soon as you activate an agent, it stays live throughout your session. That means you don’t have to reselect it every time you send a message. It’s like assigning a teammate to a task and letting them handle the rest.
Step 3: Start Chatting With the Agent
Now comes the easy part. Start interacting with your agent just like you would with a colleague.
You can write prompts (as usual), upload files, ask questions, or give specific instructions. The agent will carry out your request whether it’s summarizing a document, generating insights, or handling multiple steps in a larger workflow.
Dot takes care of the coordination behind the scenes so you can focus on outcomes, not the process.
Step 4: Track Agent Activity
While your agent remains active, you can head over to the Playground to view or edit its features. This is where you can adjust prompts, switch models, or update how the agent behaves without needing to start over.
Want to see what your agent is doing behind the scenes? Just switch to the Logic tab. Here, you’ll get a transparent view into:
- Which AI model is being used
- How each step in the workflow is progressing
- What exactly the agent is doing at any given moment
This level of visibility helps you stay in control, troubleshoot if needed, and make improvements on the fly, all without writing a single line of code.
Wrapping Up
Agent creation is not just a technical feature. It’s how you turn AI from a conversation tool into a real business partner.
With Dot, you don’t need a background in programming to build smart, responsive, and scalable AI agents. All you need is a clear task and Dot takes care of the rest.
Start small. Build confidence. And then unlock a whole new way of working.
Ready to try agent creation for yourself? : You can create a free Dot account to get started. Just log in, switch to Focused Mode, and start building your first AI agent today. You might be surprised by just how much your new teammate can do.
Frequently Asked Questions
What is an AI agent?
A digital assistant that handles a specific task like analyzing data, creating reports, or managing workflows. It works like a reliable teammate without needing a break.
Do I need technical skills to create one?
Not at all. Dot’s agent creation is completely no-code. Just explain the task and Dot will guide you through the setup.
Can I really create my own AI agents and as many as I want?
Absolutely. You can create as many custom agents as your workflows need. Whether it’s for analyzing data, generating content, or automating tasks, Dot lets you build and scale with complete flexibility.
